
Custom Home Framing Process In Vancouver: From Sill Plate To Roof
May 29, 2026 | Category: Framing Resources

The custom home framing in Vancouver usually moves from foundation checks and sill plates to floor systems, walls, beams, stairs, upper levels, roof framing, sheathing, rough-in coordination, and inspection readiness.
The exact sequence depends on the approved drawings, structural engineer, municipal requirements, supplier layouts, weather, access, and site conditions. On a Vancouver custom home, the frame is not just a fast carpentry phase. It is the structure that sets up windows, stairs, mechanical routes, envelope work, inspections, and finishing.
Custom Home Framing Process In Vancouver: 10 Steps At A Glance
Custom home framing is the structural wood framing process that builds the floors, walls, beams, stairs, roof, and bracing system from the approved plans. The goal is not only to stand the frame. The goal is to create a clean structure that lines up with the foundation, supports the design, and gives the next trades a better start.
- Review the approved drawings, structural details, lumber package, and site conditions.
- Confirm the foundation, anchor bolts, elevations, and sill plate layout.
- Install sill plates and start the first floor system.
- Set beams, posts, joists, rim board, blocking, and bearing points.
- Frame and stand exterior walls, interior walls, and major openings.
- Install engineered members, hold-downs, straps, and shear details where required.
- Frame stairs, upper floors, tall walls, and aligned load paths.
- Build the roof system with trusses, rafters, beams, sheathing, and bracing.
- Coordinate rough-ins, penetrations, envelope prep, and inspection documents.
- Complete pre-inspection review before insulation or finishes cover the work.
The work still needs to follow the approved permit drawings, structural details, supplier layouts, manufacturer requirements, and municipal inspection sequence. The City of Vancouver’s single detached house and duplex inspection guide places framing inspection before insulation, after sheathing membrane is installed, and after plumbing, gas, electrical, and mechanical rough-ins are complete, so framing should be planned with cover-up and inspection readiness in mind.
Step 1: Confirm The Foundation, Survey, And Sill Plate Layout
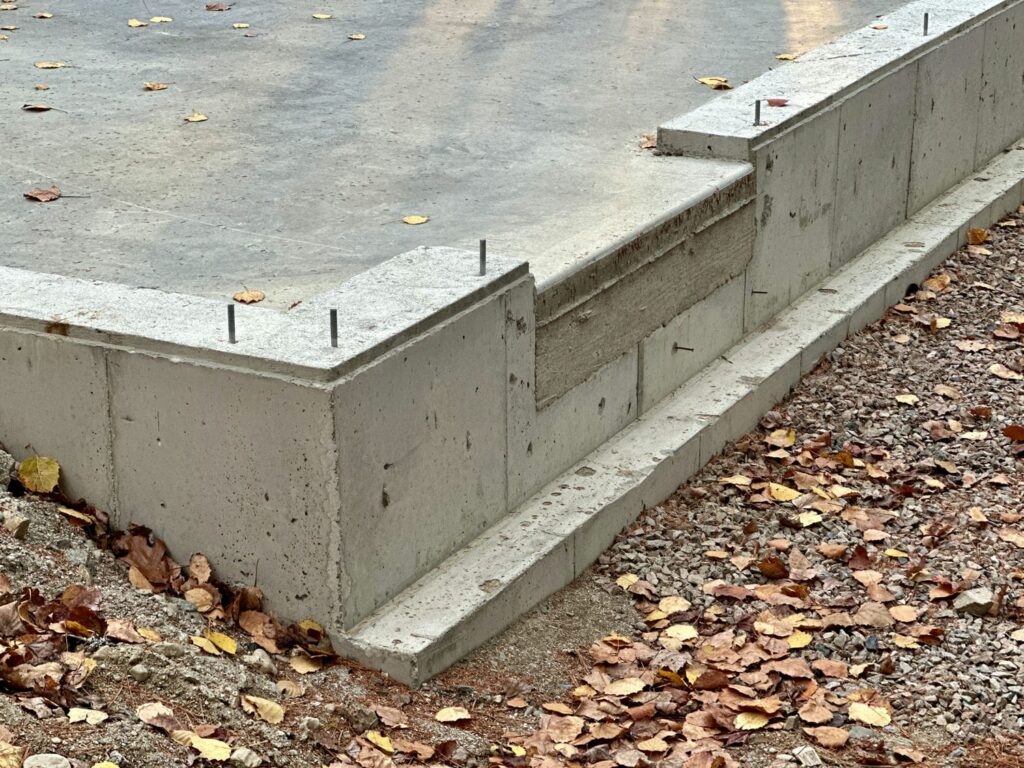
Framing starts with the foundation, not with the first bundle of lumber. Before the sill plate goes down, the crew needs to know that wall lines, anchor bolts, elevations, bearing points, hold-down locations, and access are ready for the frame. If the foundation handoff is unclear, layout issues can carry into every level above.
This first stage is one of the main reasons forming-to-framing coordination matters. A frame can only be as clean as the base it starts from. When the crew understands both the concrete and the wood structure, it can catch handoff issues before they turn into larger framing problems.
Why The Sill Plate Starts The Frame
The sill plate is the first wood member installed on top of the concrete foundation. It connects the foundation to the wood frame above and sets the starting line for the floor system and walls. If the sill plate is placed correctly, the crew has a better reference point for the rest of the frame.
If the sill plate is wrong, the problem does not stay small. It can affect the first floor system, wall layout, stair openings, roof alignment, exterior sheathing, and inspection readiness. A small shift at the base can become a larger issue by the time the frame reaches the roof.
This is why experienced framers treat sill plate layout as a control point. They check the plans, anchor bolts, foundation walls, and elevations before moving too far ahead.
What Needs To Be Checked Before Framing Begins
Before framing begins, the crew should check foundation wall alignment, anchor bolts, hold-down locations, slab or crawlspace conditions, point loads, bearing points, and access for lumber delivery. They should also confirm any sequencing issues with waterproofing, drainage, backfill, or site services that could affect framing access.
The crew also needs to confirm that the foundation is ready for safe work. That includes enough room to stage material, move around the site, and start the frame without creating avoidable hazards. On tight Vancouver lots, this planning matters before the first delivery arrives.
Anchor bolts, hold-downs, beam pockets, elevations, and wall lines all need to be coordinated through the foundation-to-framing handoff, because small forming details become framing details and the wood frame depends on the accuracy of the concrete work below.
When Residential Forming Affects The Frame
Residential forming affects the frame whenever the wood structure relies on concrete accuracy. Point loads, beam pockets, anchor bolts, hold-downs, foundation wall alignment, slab elevations, and bearing walls all need to match the framing plan. If they do not, the framing crew may need clarification before moving ahead.
A framer can make small layout adjustments in the field, but structural or foundation conflicts should be reviewed by the right project team members. Guessing around bearing points or hold-downs can create bigger issues later. The builder, engineer, and framer should align before the frame climbs too far above the foundation.
This is why residential foundation forming should be coordinated with the framing plan, especially on custom homes with large openings, stepped grades, and engineered load paths.
Step 2: Review The Drawings, Engineering, And Lumber Package

A strong framing process starts before crews cut lumber. The site lead needs to understand the architectural drawings, structural drawings, beam schedules, truss or I-joist layouts, floor openings, stair geometry, hold-down details, and municipal requirements. The frame should be built from the current approved package, not memory or old drawings.
This stage is not about slowing down the build. It is about keeping the build moving once work starts. A framing crew that reviews the drawings early can flag unclear details, missing supplier information, access concerns, and sequencing problems before the site is full of material.
Approved Drawings And Permit Documents
The framing crew should work from the current approved drawings. On a custom home, drawing sets can change through revisions, addenda, field memos, and engineering updates. Using an outdated page can create layout, inspection, or trade coordination problems.
The City of Vancouver’s building permit guidance says one printed copy of the City-approved permit and one full-size paper set of City-approved drawings with the accepted stamp need to be available at the jobsite for City inspectors. The City also says that if the accepted stamp is missing, or the paper set is not at the jobsite, the inspection may need to be rescheduled and a reinspection fee may apply.
That document discipline supports the whole framing process. When the approved set is on site, the crew, builder, inspector, engineer, and trades can check the same information instead of working from assumptions.
Engineering, Supplier Layouts, And Field Questions
Beams, trusses, I-joists, hold-downs, hangers, shear walls, point loads, and engineered details need to be reviewed before installation. Supplier layouts and beam schedules can affect the framing order, the delivery plan, and the number of people or lifts needed on site.
The crew should not guess when field conditions do not match the drawings. A missing beam note, unclear bearing point, or conflict between an opening and a structural member should be raised before material is cut. That keeps responsibility clear and reduces costly rebuilds.
Custom home framing often includes engineered lumber, large openings, and complex details. The framing crew does not replace the engineer or supplier, but it does need to understand how those documents become a buildable frame.
Site Access And Staging In Vancouver
Many Vancouver custom homes have narrow streets, rear lanes, tight side yards, neighbouring homes, tree protection areas, steep grades, and limited staging space. The lumber package needs to land in a way that supports the work sequence rather than blocking the crew.
A well-planned delivery keeps the right material close to the right stage of work. Sill plates, beams, joists, wall framing, sheathing, and roof material may not all need to land at once. Too much material in the wrong place can slow the frame, damage stock, and create safety issues.
Lower Mainland weather adds another layer. Rain, mud, wind, and limited drying windows can affect material handling and site movement. A framing crew needs a staging plan that works on the actual lot, not just on paper.
Step 3: Install Sill Plates And Frame The First Floor System
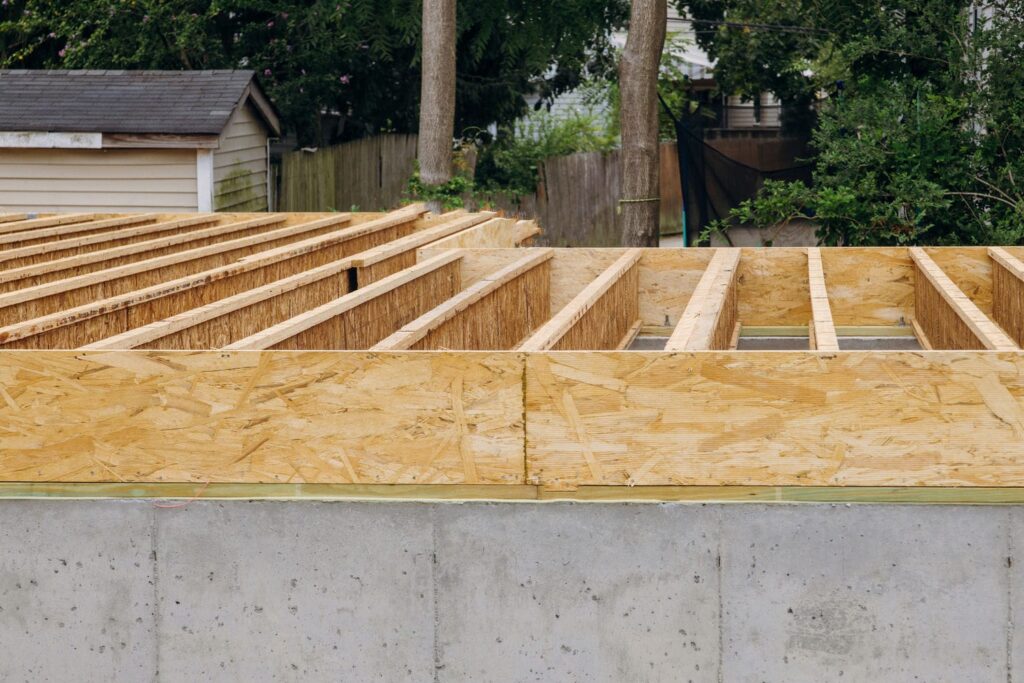
Once the foundation handoff is clear, the crew installs sill plates and starts the first floor system. This stage includes beams, posts, joists, rim board, blocking, hangers, subfloor sheathing, and layout checks. The first floor becomes the platform for the walls above, so accuracy matters.
A clean first floor system gives the rest of the frame a better start. It sets level, square, openings, bearing locations, and stair references. If the crew rushes this step, the errors can follow the project up through the walls and roof.
Sill Plates, Beams, Posts, And Bearing Points
Sill plates need to be set accurately on the foundation, then beams and posts are installed according to the approved drawings. Bearing points need to line up with the structure below and the loads above. This is where the load path starts to become visible in the wood frame.
Point loads do not stop at the first floor. They travel through beams, posts, walls, and foundation elements. If the bearing path is unclear, the crew should stop and ask for direction before continuing.
A strong framing crew checks these points before the floor is closed in. That review helps prevent problems that would be much harder to correct once walls and upper levels are installed.
Joists, Rim Board, Blocking, And Subfloor
The crew installs joists or engineered floor members, rim board, blocking, hangers, and subfloor sheathing based on the approved layout. Joist direction, spacing, bearing, hangers, stair openings, mechanical openings, and blocking all need attention before the floor becomes a working platform.
The subfloor should be installed with care because it supports layout, crew movement, and the next framing stage. Poor fastening, missed openings, or sloppy layout marks can slow wall framing. A clean deck helps the crew stand walls with more confidence.
This is also the stage where rough-in thinking begins. Plumbing, mechanical, and electrical routes may not be installed yet, but the floor system needs to leave a clear path for the trades that follow.
Quality Checks Before Walls Go Up
Before walls go up, the crew should check level, square, layout marks, openings, beam support, blocking, and any material issues. It is easier to correct a floor system before wall sections are standing on top of it.
This checkpoint is not wasted time. It protects the speed of the next stages. When walls are laid out on a clean, square platform, the frame rises faster and with fewer layout conflicts.
Disciplined crews work in checkpoints, not just speed. The goal is to move quickly without carrying mistakes into the next phase.
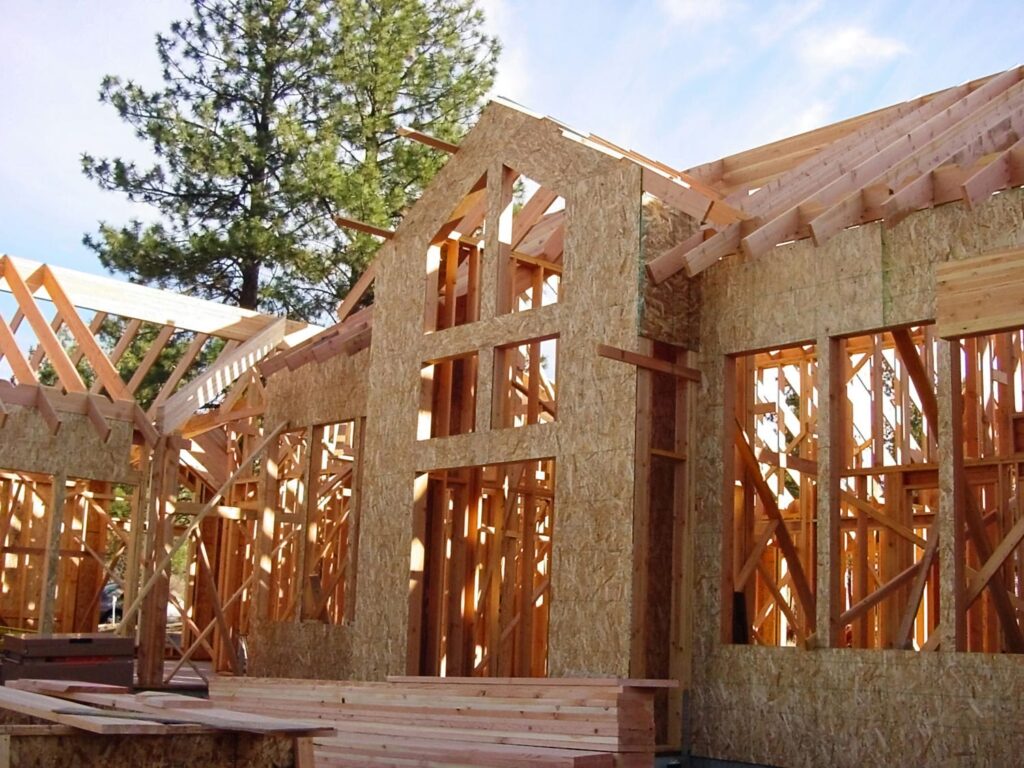
Step 4: Frame And Stand Exterior And Interior Walls

Wall framing turns the floor platform into rooms, openings, load paths, and envelope lines. The crew lays out plates, frames wall sections, checks openings, installs backing or blocking where needed, and stands walls in a planned order. On a custom home, that order matters.
Walls are not just partitions. They set window and door openings, shear wall locations, ceiling planes, cabinet backing, stair edges, mechanical routes, and finish surfaces. A wall that is out of line can affect many trades later.
Wall Layout, Plates, Studs, And Openings
The crew lays out wall plates, studs, corners, intersections, window openings, door openings, headers, and backing. The wall frame needs to match the approved drawings and leave room for windows, doors, fixtures, finishes, and services.
A good framer thinks ahead. Backing for railings, cabinets, wall-mounted fixtures, floating vanities, fireplaces, and specialty details is easier to install before walls are closed. If those details are missed, the project may need drywall cuts or extra blocking later.
Openings deserve special attention. Window and door rough openings need to match the supplier information and structural requirements. Large openings also need clear bearing, headers, trimmers, and connections.
Shear Walls, Hold-Downs, Straps, And Bracing
Shear walls, hold-downs, straps, anchors, blocking, and bracing help tie the structure together. These details should follow the approved structural drawings and remain visible for review where required. They are part of the frame, not add-ons.
The structural engineer sets the requirements for shear walls and hold-downs, and the framer’s job is to install those details cleanly. If the field condition does not match the plan, the crew should ask before changing the detail.
On a custom home, shear and hold-down details often meet large windows, open rooms, and architectural features. Those areas need careful coordination because the structure and the design both matter.
Tall Walls And Large Openings
Custom homes often include tall walls, large windows, lift-and-slide doors, feature glazing, open-concept rooms, and double-height spaces. These areas need careful framing because they affect load paths, wall straightness, envelope work, and finish quality.
Tall walls and large openings may require engineered members, bracing strategy, lift planning, and closer coordination with the engineer or supplier. They also need steady field leadership because small layout errors can become visible in glazing, drywall, cladding, and trim.
The finished home may make these features look simple. The framing behind them is usually not simple. It needs accurate layout, strong temporary support, and clean execution.
Step 5: Frame Upper Floors, Stairs, And Structural Openings

After the lower walls and first floor are in place, the frame moves up through upper floor systems, stair openings, double-height spaces, and aligned load paths. Each level depends on the one below. If the lower level is wrong, the upper level will usually show it.
This stage is where the structure becomes more complex. The crew is no longer just building one platform or one set of walls. It is connecting levels so loads, openings, stairs, shafts, chases, and roof supports line up.
Floor-To-Floor Alignment
Upper floor framing needs to align with walls, posts, beams, stair openings, mechanical chases, and bearing points below. Layout errors can multiply as the frame rises. A missed reference on the first floor can become a major conflict at the roof.
Accurate alignment helps later trades. Mechanical, plumbing, electrical, drywall, windows, stairs, and exterior envelope work all benefit when floors and walls line up cleanly. A straight frame reduces field adjustments for everyone.
This is one reason field leadership matters. The crew needs to see the structure as a connected system, not just a sequence of separate tasks.
Stairs, Open Areas, And Double-Height Spaces
Stairs, open-to-below areas, and vaulted spaces need careful layout because they affect structure, headroom, guard locations, finishes, and inspection. A small change in stair geometry can affect drywall, flooring, railings, trim, and final access.
The framing crew needs to follow the approved plans and applicable municipal requirements for stair rise, run, headroom, and related details. Complex stairs, open risers, feature stairs, and double-height spaces often need more coordination with the builder, designer, and engineer.
These spaces also affect safety during construction. Open edges, temporary guardrails, access points, and crew movement need to be managed while the frame is still open.
Load Paths Between Levels
Loads from upper floors and the roof need to travel through beams, posts, walls, and foundation supports. That path should be clear before the crew closes up key areas or moves too far ahead. If a point load does not land where expected, the issue needs review.
A framer should understand more than layout marks. The crew needs to understand bearing, bracing, sequencing, and how one level affects the next. This reduces the chance of avoidable framing issues on complex custom homes.
Red Seal-led carpenters are trained to think through layout, load paths, and field sequencing. That training supports cleaner work from sill plate to roof.
Step 6: Frame The Roof
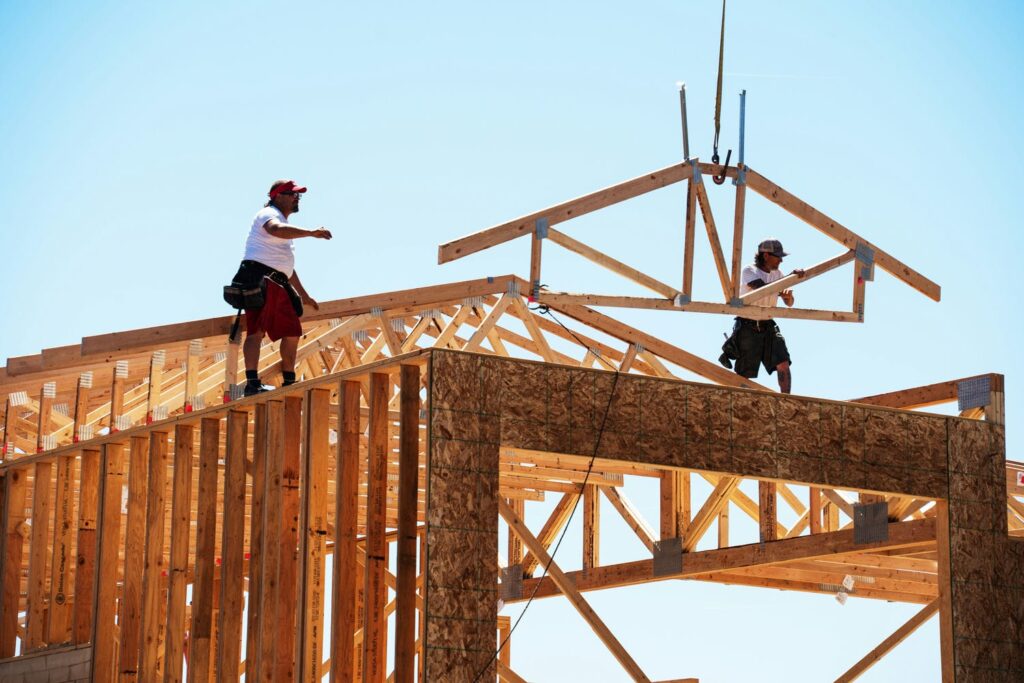
Roof framing is one of the most visible and demanding stages of the custom home framing process. Depending on the design, the roof may include trusses, rafters, hips, valleys, ridge beams, engineered members, dormers, overhangs, skylights, roof sheathing, and bracing.
The roof stage ties the frame together and sets up the envelope, roofing, ventilation, and exterior finishing sequence. A roof that is well planned on paper still needs to be buildable on the actual site.
Trusses, Rafters, Beams, And Roof Geometry
Roof framing starts with confirming the drawings, roof geometry, bearing points, truss layouts, engineered beams, and installation sequence. Some roofs are straightforward. Architectural custom homes often require more planning because roof forms can intersect with vaulted ceilings, skylights, tall walls, and exterior design features.
Trusses and rafters need to land on the right bearings. Beams need to align with posts or supporting walls. Roof slopes, overhangs, and openings need to match the approved plans so the exterior envelope can follow cleanly.
Roof complexity affects the framing sequence, labour plan, lift needs, and coordination with the engineer, architect, and supplier.
Sheathing, Overhangs, Fascia, And Openings
Once the roof frame is built, the crew may install roof sheathing, overhang framing, fascia backing, skylight openings, attic access, and related bracing. These details affect roofing, ventilation, gutters, exterior finishes, and future inspections.
Openings need careful coordination. Skylights, roof vents, chimneys, mechanical penetrations, and attic access points should not be left as afterthoughts. The more clearly these are planned, the easier it is for roofing and mechanical trades to follow.
Roof sheathing also helps stiffen and tie the roof structure together. The crew should follow the approved drawings and required fastening details, while keeping the work safe and accessible.
Keeping The Roof Buildable On Site
Roof framing needs practical planning around access, lifts, weather, safety, staging, and crew flow. Vancouver lots often make this harder because material space, lane access, and neighbouring buildings can limit how the crew works.
A good roof sequence considers where material lands, how it gets lifted, where crews can work safely, and how the home will be protected during changing weather. The fastest plan is not always the safest or cleanest plan.
The best roof sequence is not just drawn well. It is planned so the crew can build it cleanly on the actual site
Step 7: Sheath, Brace, And Prepare The Envelope
Sheathing and bracing help the frame become stable, tied together, and ready for the exterior envelope sequence. Wall sheathing, roof sheathing, temporary bracing, permanent bracing, and exterior openings all affect what happens next.
This stage connects framing to weather protection, windows, doors, roofing, rainscreen, cladding, and inspection readiness. A clean frame is not only straight. It is ready for other trades to work without confusion.
Wall And Roof Sheathing
Wall and roof sheathing help tie the frame together and prepare the home for envelope work. Sheathing layout, fastening, openings, and penetrations should match the approved drawings and structural details. The crew should check that openings stay clean and that the work supports the next phases.
Sheathing is part of framing, not an afterthought. It affects structural bracing, exterior finishes, window installation, roofing, and rain protection. Mistakes at this stage can create delays for envelope crews.
A well-sheathed frame also makes the site feel more controlled. It helps the structure take shape and gives the builder a clearer path toward rough-ins and inspections.
Temporary Bracing And Weather Protection
Temporary bracing keeps the frame stable during construction. Permanent bracing and sheathing help the frame work as designed. Both need attention because the structure is exposed while it is being built.
Weather protection matters in Vancouver and the Lower Mainland. Framing often happens through rain, damp air, and changing site conditions. Material staging, covers, drainage, safe access, and temporary protection can all affect quality and schedule.
No crew can control the weather, but a disciplined crew can plan for it. A clean site and protected material package help reduce delays, damage, and rework.
Handoff To Windows, Rainscreen, Roofing, And Exterior Trades
Once the structure is framed and sheathed, the home begins moving toward windows, doors, roofing, rainscreen, cladding, and exterior finishing. Framing accuracy affects every one of those trades. Openings, edges, rooflines, backing, and sheathing all need to be ready.
This is where poor framing becomes expensive for other teams. A rough opening that is wrong, a wall that is not straight, or an unclear roof edge can slow the next trade. A clean frame reduces that friction.
A framing crew is not just finishing its own scope. It is setting the table for the rest of the build.
Step 8: Coordinate Rough-Ins And Inspection Readiness
The framing process does not end when the roof is on. Before insulation and finishes can cover the work, the structure needs to coordinate with plumbing, electrical, mechanical, gas, sprinkler, envelope, and engineering requirements. The frame also needs to be ready for municipal inspection.
This stage is where a lot of projects feel pressure. Trades are moving through the building, openings are being drilled, documents are being gathered, and the builder is trying to keep the schedule moving. A strong framing crew helps keep that coordination practical.
Plumbing, Electrical, Mechanical, Gas, And Sprinkler Rough-Ins
Rough-in trades often pass through framed walls, floors, ceilings, and chases. The framing crew needs to coordinate holes, notches, openings, backing, protection, and chases so the structure is not weakened or altered outside the approved design.
The framer does not replace licensed trades. However, a strong framing crew helps the site avoid conflicts before inspection. If a duct route conflicts with a beam or a plumbing stack needs more room than planned, the team should solve that before walls are closed.
This is especially important in custom homes with tight ceiling planes, large open rooms, feature walls, and hidden mechanical routes. The cleaner the coordination, the fewer surprises before cover-up.
Framing Inspection Timing In Vancouver
The City of Vancouver’s single detached house and duplex inspection guide says framing inspection is performed before insulation is installed, after the sheathing membrane is installed, and after rough-in work for plumbing, gas, electrical, and mechanical systems is complete. The guide also lists structural framing, insulation preparation, zoning compliance, stairs, ventilation, smoke alarms, fire stop, fire separation, and required documents as items at the framing inspection stage.
That inspection sequence is one reason framing should be planned with cover-up in mind. The crew needs to leave critical structure, connectors, fire blocking, stair details, and rough-in paths visible until they are reviewed. If the project closes too early, it may need to open work again.
Knowing what framing rough-in inspections in BC actually check helps the crew leave the right structure, connectors, and rough-in paths visible before walls are covered.
Documents To Have Ready Before Cover-Up
Framing documents may include approved drawings, engineering letters, truss letters, supplier layouts, field memos, and ventilation checklists where required. The exact list depends on the municipality, permit package, engineering scope, and project type.
In Vancouver, building inspections are meant to confirm that construction and trade work matches the permit, complies with relevant bylaws, and meets safety, accessibility, and green building goals. The City also notes that additional fees can apply when a site is not accessible or safe, plans or representatives are not available when required, work is not ready, or work has progressed beyond the inspection point and needs uncovering.
The practical takeaway is simple. Do not treat inspection documents as paperwork to find later. Keep the current permit, approved drawings, supplier documents, and required letters organized before the inspection window arrives.
What Makes Vancouver Custom Home Framing More Complex
Vancouver custom home framing has local challenges that affect the process. Tight lots, lane access, rain, neighbours, tree protection, steep grades, existing structures, and limited staging space can all change how the crew works. The frame may look similar to a project elsewhere, but the site often asks more from the crew.
A framing process that works on a wide open site may need a different plan on a Vancouver infill lot.
Tight Lots, Lanes, Neighbours, And Staging
Many Vancouver custom homes have limited room for lumber storage, lifts, bins, crew parking, and deliveries. Material may need to arrive in stages so it does not block the excavation, lane, sidewalk, or working area. Good logistics help the crew build instead of constantly moving piles.
Neighbouring homes also matter. A tight side yard, shared lane, or sensitive property line can affect how material is handled and how safely the crew can work. The site needs to stay organized for both production and safety.
Good staging affects speed and quality. Crews frame better when the right material is available in the right order and the site is not fighting every movement.
Rain, Moisture, And Site Protection
Lower Mainland weather affects framing. Lumber, sheathing, subfloors, openings, hardware, and site access all need to be managed through rain and wet conditions. Poor site protection can create delays and unnecessary stress.
A good crew plans for wet conditions with practical steps. That can include covered storage where possible, organized staging, drainage awareness, clean access paths, and communication with the builder about sensitive materials or assemblies.
Site-specific moisture questions should be handled through the builder, envelope consultant, engineer, supplier, or manufacturer guidance where applicable. The framer’s role is to protect the work, keep the site moving, and raise concerns before they become larger problems.
Existing Homes, Heritage Conditions, And Additions
Additions, infill homes, and heritage renovations can add complexity because new framing may need to tie into older foundations, uneven framing, protected architectural elements, or existing rooflines. The crew may need to adjust sequencing while still respecting the approved drawings and engineering.
Existing buildings rarely behave like new drawings. Floors may not be level, walls may not be straight, and hidden conditions may appear once work opens up. That makes communication with the builder, engineer, and heritage team important.
When older homes or protected details are part of the scope, heritage renovations need careful framing leadership so new structure and existing character can work together.
How Our Team Manages The Framing Process
Our team manages custom home framing as a connected process from foundation handoff to roof structure and inspection readiness. We focus on field leadership, clean sequencing, trade coordination, and practical communication. That helps the builder and owner move through the frame with fewer surprises.
The value is not only that the structure goes up. The value is that each stage is checked before it creates problems for the next one. Custom home framing should feel controlled, clear, and well sequenced.
Red Seal-Led Field Leadership
Our field work is led by Red Seal carpenters who understand layout, load paths, sequencing, material handling, and inspection readiness. That leadership helps the crew catch problems before they become delays.
We are also an ITA-approved Red Seal Carpentry training authority. That supports consistent standards, stronger crew development, and better site habits across the team.
On a custom home, trained field leadership matters because the work changes from stage to stage. The crew needs to understand the drawings, the structure, and the next trade, not just the task in front of them.
Combined Forming And Framing Perspective
Our combined forming and framing experience helps connect the foundation stage to the frame. Sill plates, anchor bolts, bearing points, hold-downs, wall layouts, and point loads all benefit from that connection.
This matters because many framing issues begin before the lumber arrives. A missed hold-down, unclear bearing point, or foundation layout conflict can slow the frame once crews are on site. Seeing the structure from concrete to roof helps reduce that risk.
We do not replace the engineer, municipality, or approved drawings. We help coordinate the field work so the approved structure can be built cleanly.
Stable Crews And Owner-Led Coordination
We are owner-led by Luke Creten and have been in business since 2013. We build around stable crews with low turnover, which supports better communication and a more consistent site experience.
Stable crews matter on custom homes because details carry from one stage to the next. When field knowledge stays on site, the team is less likely to lose track of layout decisions, handoff notes, and builder expectations.
That helps the project feel calmer. The frame rises with a clear plan, and the owner and builder can enjoy more of the journey instead of chasing the same issues twice.
Plan Your Custom Home Framing From Sill Plate To Roof
A well-run custom home framing process gives every next trade a better start. When the foundation handoff, sill plate layout, floor system, walls, beams, stairs, roof framing, rough-ins, and inspections are managed as one sequence, the build feels more organized from the ground up.
Anvil West brings Red Seal-led field leadership, combined forming-to-framing experience, stable crews, and owner-led coordination to custom homes across Vancouver and the Lower Mainland. To review your framing scope before the lumber package or schedule is locked in, work with a residential framing contractor in the Lower Mainland who can plan around your structural details from the start.
If you would like to book a consultation with Anvil West, the best time is before your framing schedule is locked in.
Frequently Asked Questions
What Are The Main Steps In The Custom Home Framing Process?
The custom home framing process usually moves from foundation checks and sill plates to floor systems, walls, beams, stairs, upper floors, roof framing, sheathing, rough-in coordination, and inspection readiness, and on a custom home those steps need more coordination than a basic build because the crew must work from approved drawings, structural details, supplier layouts, site conditions, and the builder’s schedule.
What Is A Sill Plate In Home Framing?
A sill plate is the first wood member installed on top of the concrete foundation, connecting the foundation to the wood frame and setting the starting line for the floor and wall layout, which is why anchor bolts, bearing points, hold-downs, and foundation alignment should be checked before the crew moves too far ahead.
When Does Framing Start After The Foundation Is Complete?
Framing can start once the foundation is ready, layout is confirmed, required inspections or documents are complete, and the site can safely receive the lumber package, so the crew should not start framing just because the concrete is in place: the foundation handoff, documents, access, and delivery plan all need to support the work.
How Long Does Custom Home Framing Take In Vancouver?
The framing timeline depends on home size, design complexity, weather, access, crew size, engineered lumber, roof complexity, and inspection coordination, so a simple frame may move quickly while a complex architectural home needs more time for sequencing and review; the more useful question is whether the frame is being built in the right order, because carrying errors into upper floors, roof framing, or inspections costs more time later.
What Does The Framing Crew Check Before Walls Go Up?
Before walls go up, the crew should check the floor system, layout, squareness, bearing points, openings, beams, joists, blocking, anchor locations, and structural details that affect the walls above, since once walls are standing, floor system corrections become harder and more disruptive.
How Does Roof Framing Fit Into The Custom Home Framing Process?
Roof framing comes after the main floor and wall structure is ready to support it, and depending on the design it may include trusses, rafters, beams, hips, valleys, overhangs, skylights, sheathing, and bracing; it also sets up the envelope sequence, since roofing, ventilation, skylights, gutters, cladding, and rainscreen details all depend on accurate roof framing.
What Inspections Affect Framing In Vancouver?
Framing inspection and rough-in coordination are the key inspection points before insulation and finishes cover the work; requirements vary by municipality, permit package, and project type, so the builder should confirm the inspection sequence with the local building department, though for Vancouver single detached houses and duplexes the City’s inspection guide places framing inspection before insulation and after rough-in work for plumbing, gas, electrical, and mechanical systems is complete.
Why Does The Foundation-To-Framing Handoff Matter?
The frame depends on the foundation for wall layout, bearing points, anchor bolts, hold-downs, elevations, and load paths, so a clean handoff helps the framing crew start with fewer layout conflicts and fewer delays, which is especially important on custom homes with large openings, point loads, tall walls, stepped foundations, or complex floor systems where the structure works best when the concrete and wood stages are coordinated.